What is super durable, comes in a variety of colors and patterns, and is a crafters best friend? Why that would be.... DUCT TAPE!! The most famous being Duck Brand, that one with the cute little ducky on the front. If you don't have duct tape in your craft drawer, get it. Believe me, there is so much you can do with it!
check out there
website. they have a ton of different styles, colors, and patterns, as well as a how-to section!
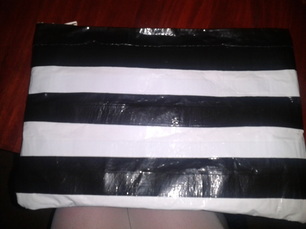
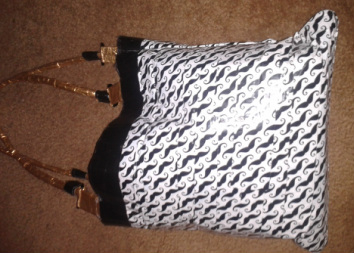
I picked up some duct tape a while back at 5 Below (for only 4 dollars a roll!!!). The main reason for the purchase? They had one with mustaches ALL OVER IT! I had to have it, but then I spent days looking at it saying to myself ... what can I do with this. Then bam! I looked at my beat up, well loved, purse and said, "you gotta go" and spent the next few hours crafting myself a bag. I had enough left over to make a little hand purse as well. And guess what lovelies? I created a HOW-TO so you can do it as well, and it's a two-fer: 1 how-to, two different bags! Check it out...
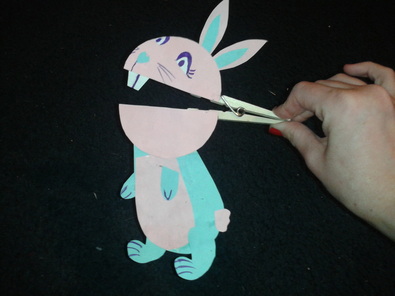
A few weeks ago I was enlisted by a friend to assist with a puppet workshop for elementary and middleschool students. I knew I wanted to do brown paper bag puppets as one option; they are easy and demonstrate that anything can become a puppet and a puppet can be made from anything.
But I wanted to have a second option for the older kids who may have already had experience with the brown paper bag puppets. I still wanted it to be easy and I still wanted it to showcase that puppets can be anything so I came up with this little guy:
Isn't he cute? And he was super easy to make! Take a look at my how-to in the techniques section. It's a great idea for moms and babysitters on rainy days, and also for teachers. Speaking of teachers, I am thinking of starting an education page for my blog which will demonstrate ways to use certain how-tos in lesson plans. What do you think?
Looking for more puppets? Check out my how-to for
SOCK PUPPETS!
So sorry for the lack of posts lately. :(. As you know life can take crazy course. Although things have been hectic, I have been crafting a little. Mostly pattern inspired crafting, but I wanted to share them with you!
It seems that the dresses I have worked on have had a very Twiggy/60's/Mod feel. I even recently cut all my hair off in a short pixie style - Mia Farrow would be so proud!
Away we go!
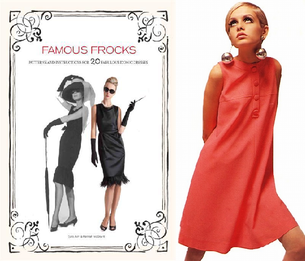
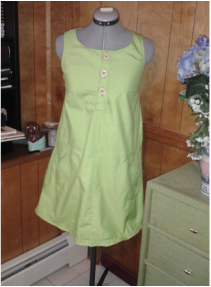
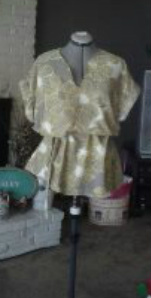
the first dress I worked on was from a pattern I found in: Famous Frocks - a book I picked up a while ago and never had a chance to utilize! It's a really awesome book with easy to follow directions. I recommend it highly!
| |
I really loved the final results! I made the dress out of a lime green broadcloth: that's another great thing about the book- each project gives a list of different patterns that would be suitable for the style of the dress. I feel so much like Twiggy in this gown:
|
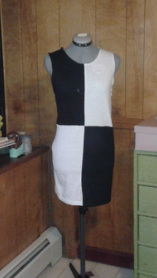
The second dress I worked on was a black and white checkerboard dress made from t-shirts. I got the how-to from
Rookie Mag. If you haven't checked out this website you NEED to. It's absolutely wonderful!
The how-to which you can find here gave super easy to understand directions and the dress literally took me only an hour! Plus, who doesn't like a dress made of wicked cheap and outrageously comfortable cotton t-shirts. Antother thing I love, is that you could use virtually any combinations on colors. I went for the more traditional - this time! I would love to try making a neon one next! | |
Once you have the mod dress down, you should also check out Rookie's tutorial for Mod eye make up. It is the final detail that really pulls the 60's look all together! Get the look
here!
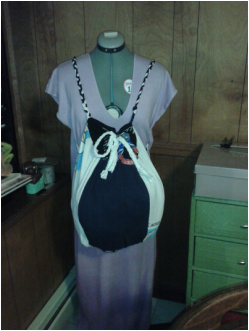
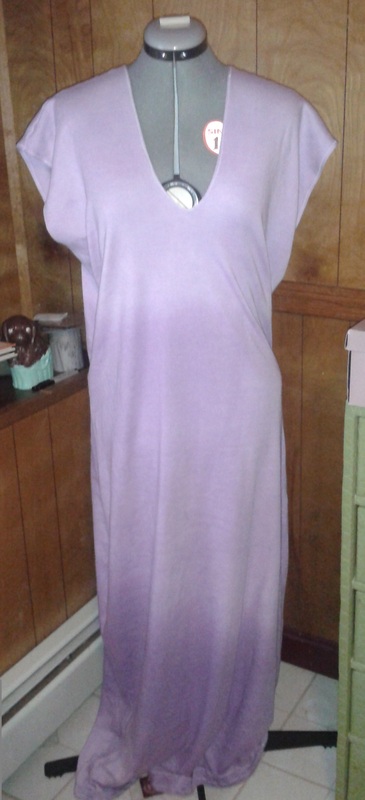
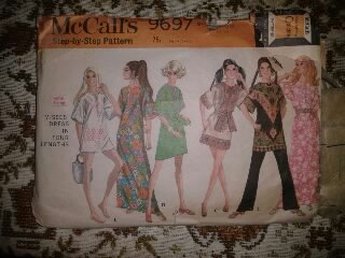
Last summer my mother went to a flea market and purchased a basket full of vintage patterns from the 60's, 70's and 80's for me. Since then I really haven't had the time and the money to try out the patterns. Also, since I am a self-taught sewer - picking up tips and techniques from people, and websites - I was slightly hesitant to attempt a pattern as I had never done it before. A few weeks ago I finally pulled out some cash, purchased some fabric and started trying out the patterns I have.
I call this entry "Adventures in Pattern Land." Come with me! and expect more in the future!
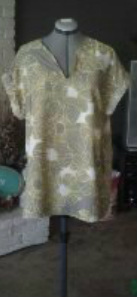
This is the first pattern I attempted. It's from 1969. The shape is relatively simple and it left a lot of room for editing and hiding mistakes. I also really love that the pattern only cost 75 cents!
I shortened it somewhat to make it a long tunic rathen then a short dress and I added a folded detail to the sleeves because the general shape of the dress was a little to t-shirt looking and I wanted it slightly more dressy. I love that the pattern was so easy to edit and modernize!
So I have become transfixed with trying new and interesting things with my nails! I love the ombre look, or super sparkly. Anyway, while I don't have time to post a how-to of some of the projects I have been working on, I did want to post a few links with ideas for glamorizing your nails!
Away We Go
-
Seventeen Magazine has 10 different nail decorating ideas! My favorite is the one where you dip your finger in Glitter! I tried this the other night and it came out really awesome and was super easy!
-
Bellasugar has a slideshow with beautiful nail polish suggestions! I've done the watermelon look before and it comes out absolutely adorable, although it can be a little tricky getting the lines to look clean!
-
Beautylish has a great how-to for the Newspaper nails!
-
Swagger has a how-to for Caviar Nails which I have absolutely fallen in love with! I really want to try these!
There are so many other websites out there! If you find any good ones, share them with me!
Holy crap! Nearly 3 months since my last post! I guess that speaks for itself in regards to how outrageously busy I've been with school, work, and personal things! Without a huge spiel, here's a couple of how-tos I have been wanting to post:
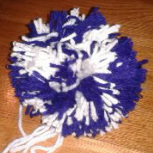
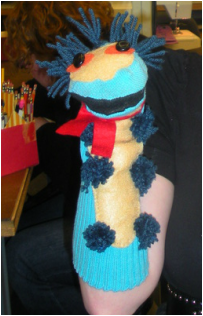
as promised - about 3 months ago - here is the technique behind making a pom-pom out of yarn, as seen on my
sock puppet . I also love to make huge ones and wear them on my head as a ridiculously-couture head piece. I've actually recieved a lot of compliments and a few people who want me to make some, so if you're looking for a new hair piece, try making one of these puppies!
these next two how-tos are gifts I made for my boyfriend. I was so happy with how they came out and they where both really easy, I wanted to share them with you:
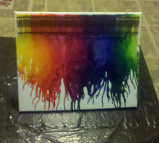
Super Easy. Super Fun. Super Awesome. I loved doing this project and it looks great when it's finished. I know there are a lot of how-tos out there, but I wanted to share the process I did as well!
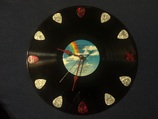
Another classic project. It has such a clean and modern look when it's done. My boyfriend is a guitarist and has a huge passion for musc. He also had no clock in his room, so this was an ideal gift!
Here is my first of many posts of the puppets I will be working on this semester!
The first puppets we created where sock puppets, which are a basic tube with no arms or legs. It only requires 1 puppeteer to manipulate and the only thing being manipulated is the head and the mouth!
For my puppet I was inspired by (of course) Jim Henson and his film The Labyrinth! I wanted to create a Labyrinth character which would translate most successfully into a tube puppet and I decided to re-create the little caterpillar that Jennifer Connelly meets just outside of the labyrinth walls:
All I used was felt, yarn and buttons for the eyes. I used the same yarn from the hair to create little pom-poms for the feet. Expect a how-to later on the pop-pom making technique!
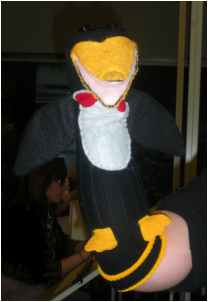
My friend Sarah made this adorable penguin using felt and black buttons for eyes as well. She also added little flippers by stuffing some felt with cardboard and stitching it on!
Interested in making one of these crazy critters yourself? check out my
how-to for sock puppets to make your own!

 RSS Feed